이득우 님의 강의
와 다른 개발자가 정리해놓은 문서를 보고 정리한 내용입니다.
자세하고 정확한 내용은 위 링크를 참조하세요
시리즈
GAS 기초
GAS 캐릭터 제작 기초
어트리뷰트와 게임플레이 이펙트
- 언리얼 GAS 캐릭터 어트리뷰트
- 언리얼 GAS 게임플레이 이펙트
- 언리얼 GAS 어트리뷰트와 UI 연동
GAS의 활용
- 언리얼 GAS 아이템 상자 구현
- 언리얼 GAS 광역 스킬 구현
이번 포스트에서는 사용자의 입력을 통해 어빌리티(점프, 공격)를 발동시키는 방법에 대해 알아보겠다.
OwnerActor와 AvatarActor
게임플레이 어빌리티 시스템에서의 OwnerActor란 AbilitySystemComponent를 가지고 있는 액터를 말한다.
이에 비해 AvatarActor란 AbilitySystemComponent의 물리적 표현을 의미한다.
앞선 포스트에서 살펴보았듯이, OwnerActor와 AvatarActor는 같은 액터로 설정될 수 있다.
1
2
|
// 간단한 경우에 한함
	AbilitySystemComponent->InitAbilityActorInfo(this, this);
|
보통 캐릭터의 능력은 현재 상태에 따라 발동되는 경우가 대부분이기 때문에, PlayerState를 OwnerActor로 두는 경우가 많다.
이번 포스트에서도 역시 PlayerState에 어빌리티 시스템을 부착하고, OwnerActor와 AvatarActor를 설정하겠다.
(단, Owner와 Avatar가 다른 경우에도 두 액터 모두 IAbilitySystemInterface를 구현해야 함!)
 1
 2
 3
 4
 5
 6
 7
 8
 9
10
11
12
13
14
15
16
17
18
19
20
21
22
23
24
25
26
27
28
29
30
31
32
33
34
35
36
37
38
39
40
|
// Owner 클래스
AABGASPlayerState::AABGASPlayerState()
{
	AbilitySystemComponent = CreateDefaultSubobject<UAbilitySystemComponent>(TEXT("AbiltiySystemComponent"));
	// AbilitySystemComponent->SetIsReplicated(true);
}

UAbilitySystemComponent* AABGASPlayerState::GetAbilitySystemComponent() const
{
	return AbilitySystemComponent;
}

// Avatar 클래스
AABGASCharacterPlayer::AABGASCharacterPlayer()
{
	AbilitySystemComponent = nullptr;
	//AbilitySystemComponent->SetIsReplicated(true);
}

UAbilitySystemComponent* AABGASCharacterPlayer::GetAbilitySystemComponent() const
{
	return AbilitySystemComponent;
}

void AABGASCharacterPlayer::PossessedBy(AController* NewController)
{
	Super::PossessedBy(NewController);

	auto _PlayerState = GetPlayerState<AABGASPlayerState>();
	if(_PlayerState->IsValidLowLevelFast())
	{
		// 아바타에도 어빌리티 시스템 컴포넌트가 있지만, Owner의 컴포넌트에 대한 참조일 뿐이다.
		AbilitySystemComponent = _PlayerState->GetAbilitySystemComponent();
		AbilitySystemComponent->InitAbilityActorInfo(_PlayerState, this);
		// do sth...

// NOTE : 멀티플레이 게임에서는 InitAbilityActorInfo 위치가 바뀌어야 함!
// (PossessedBy 메서드는 서버에서만 불리기 때문)
// 일단은 싱글플레이 예시이기 때문에 컨트롤러가 pawn을 possess할 때
// 어빌리티 시스템의 InitAbilityActorInfo를 호출하는 것으로 설정
|
또한 PlayerState는 서버와 클라이언트 간 pub-sub이 용이한 클래스이기 때문에 멀티플레이 게임 개발시에는 특히나
PlayerState 클래스를 Owner로 설정하는 것이 좋다.
FGameplayAbilitySpec과 FGameplayAbilitySpecHandle
이전 포스트에서 살펴보았듯이 액티비티 시스템 컴포넌트에 어빌리티를 부여하기 위해서는 먼저 FGameplayAbilitySpec 구조체를 생성하여 등록해야 한다.
생성된 구조체 인스턴스를 GiveAbility 혹은 GiveAbilityAndActivateOnce 메서드를 이용해 등록하면 된다.
 1
 2
 3
 4
 5
 6
 7
 8
 9
10
11
12
13
14
15
16
17
18
19
|
// 어빌리티 시스템 컴포넌트에 어빌리티 부여
	for (auto Element : Abilities)
	{
		FGameplayAbilitySpec Spec(Element);
		AbilitySystemComponent->GiveAbility(Spec);
	}

// FGameplayAbilitySpec 선언부 중 일부
USTRUCT(BlueprintType)
struct GAMEPLAYABILITIES_API FGameplayAbilitySpec : public FFastArraySerializerItem
{
    GENERATED_USTRUCT_BODY()

    FGameplayAbilitySpec()
    : Ability(nullptr), Level(1), InputID(INDEX_NONE), SourceObject(nullptr), ActiveCount(0), InputPressed(false), RemoveAfterActivation(false), PendingRemove(false), bActivateOnce(false)
    { }

    /** Version that takes an ability class */
    FGameplayAbilitySpec(TSubclassOf<UGameplayAbility> InAbilityClass, int32 InLevel = 1, int32 InInputID = INDEX_NONE, UObject* InSourceObject = nullptr);
|
이렇게 등록된 어빌리티는 컴포넌트 내부에 있는 FGameplayAbilitySpecContainer ActivatableAbilities를 통해 접근할 수 있다.
 1
 2
 3
 4
 5
 6
 7
 8
 9
10
11
12
13
14
15
|
// AbilitySystemComponent.h
    UPROPERTY(ReplicatedUsing=OnRep_ActivateAbilities, BlueprintReadOnly, Category = "Abilities")
    FGameplayAbilitySpecContainer ActivatableAbilities;

    /** Returns the list of all activatable abilities. Read-only. */
    const TArray<FGameplayAbilitySpec>& GetActivatableAbilities() const
    {
    return ActivatableAbilities.Items;
    }

    /** Returns the list of all activatable abilities. */
    TArray<FGameplayAbilitySpec>& GetActivatableAbilities()
    {
    return ActivatableAbilities.Items;
    }
|
한편 능력 발동에 대한 메서드들에서는 아래처럼 FGameplayAbilitySpecHandle 구조체를 인자로 받는 것을 확인할 수 있는데,
1
2
3
4
|
    FGameplayAbilitySpecHandle GiveAbility(const FGameplayAbilitySpec& AbilitySpec);

    UFUNCTION(BlueprintCallable, Category = "Abilities")
    bool TryActivateAbility(FGameplayAbilitySpecHandle AbilityToActivate, bool bAllowRemoteActivation = true);
|
이는 어빌리티 시스템 컴포넌트에서 GameplayAbility를 다룰 때
능력과 관련된 구조체를 아래와 같이 설계했기 때문이다.
- FGameplayAbilitySpec : 능력 자체를 의미하는 구조체. 능력의 상태, 발동횟수 등과 같은 정보를 담고있다.
- FGameplayAbilitySpecHandle : 능력을 고유하게 식별하기 위해 사용되는 구조체. GameplayAbility의 타입마다 하나씩 생성된다.

핸들의 값은 스펙 생성시 자동으로 1씩 증가한다
 1
 2
 3
 4
 5
 6
 7
 8
 9
10
11
12
13
14
15
16
17
18
19
20
21
22
23
24
|
/** Handle that points to a specific granted ability. These are globally unique */
USTRUCT(BlueprintType)
struct FGameplayAbilitySpecHandle
{
	GENERATED_USTRUCT_BODY()

	FGameplayAbilitySpecHandle()
		: Handle(INDEX_NONE)
	{
	}

	/** True if GenerateNewHandle was called on this handle */
	bool IsValid() const
	{
		return Handle != INDEX_NONE;
	}

// 중략

private:

	UPROPERTY()
	int32 Handle;
};
|
이제 어떻게 입력을 BindAction할 수 있을지 생각해보자. 기존의 InputComponent을 이용한다면 액션마다
메서드를 하나씩 생성하여 BindAction 메서드에 인자로 넘겨주어야 할 것이다.
GAS를 이용하는 경우 액션을 발동시키기 위해서는 어빌리티 시스템 컴포넌트에서 태그나 스펙 등을 이용해서 어빌리티를 활성화시켜야하는데,
어빌리티의 구현부를 GameplayAbiltiy로 독립시켜놨음에도 불구하고 기존의 방식처럼 메서드를 하나씩 생성하는 것은 바람직하지 않다.
이에 FGameplayAbilitySpec에는 InputID라는 필드가 존재한다.
이와 EnhacnedInputComponent::BindAction을 함께 이용하면 범용적인 입력처리가 가능해진다.
 1
 2
 3
 4
 5
 6
 7
 8
 9
10
11
12
13
14
15
16
17
18
19
20
21
22
23
24
25
26
27
28
29
30
31
32
33
34
35
36
37
38
39
40
41
42
43
44
45
46
47
48
49
|
void AABGASCharacterPlayer::SetupPlayerInputComponent(UInputComponent* PlayerInputComponent)
{
	Super::SetupPlayerInputComponent(PlayerInputComponent);

	SetupGASInputComponent();
}

void AABGASCharacterPlayer::SetupGASInputComponent()
{
	if(IsValid(AbilitySystemComponent) && IsValid(InputComponent))
	{
		auto EnhancedInputComponent = CastChecked<UEnhancedInputComponent>(InputComponent);

		EnhancedInputComponent->BindAction(JumpAction, ETriggerEvent::Triggered, this, &ThisClass::OnGASInputPressed, (int32)EPLAYERGASINPUTTYPE::JUMP);
		EnhancedInputComponent->BindAction(JumpAction, ETriggerEvent::Completed, this, &ThisClass::OnGASInputReleased, (int32)EPLAYERGASINPUTTYPE::JUMP);
		EnhancedInputComponent->BindAction(AttackAction, ETriggerEvent::Triggered, this, &ThisClass::OnGASInputPressed, (int32)EPLAYERGASINPUTTYPE::ATTACK);
		EnhancedInputComponent->BindAction(AttackAction, ETriggerEvent::Completed, this, &ThisClass::OnGASInputReleased, (int32)EPLAYERGASINPUTTYPE::ATTACK);
	}
}

void AABGASCharacterPlayer::OnGASInputPressed(int32 InputID)
{
	auto Spec = AbilitySystemComponent->FindAbilitySpecFromInputID(InputID);
	if(Spec)
	{
		Spec->InputPressed = true;
		if (Spec->IsActive())
		{
			AbilitySystemComponent->AbilitySpecInputPressed(*Spec);
		}
		else
		{
			AbilitySystemComponent->TryActivateAbility(Spec->Handle);
		}
	}
}

void AABGASCharacterPlayer::OnGASInputReleased(int32 InputID)
{
	auto Spec = AbilitySystemComponent->FindAbilitySpecFromInputID(InputID);
	if(Spec)
	{
		Spec->InputPressed = false;
		if (Spec->IsActive())
		{
			AbilitySystemComponent->AbilitySpecInputReleased(*Spec);
		}
	}
}
|
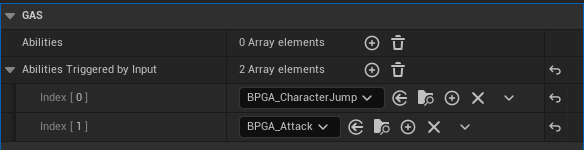
이제 점프 어빌리티와 공격 어빌리티를 생성해 어빌리티 시스템 컴포넌트에 등록해주면 된다.
점프 어빌리티는 GAS 플러그인이 기본으로 제공하는 클래스를 이용하도록 하고, 공격 어빌리티 클래스는 AbilityTask를 활용해 제작하도록 하겠다.
GAS 플러그인이 기본적으로 제공하는 Jump 어빌리티의 구현부를 보자
1
2
3
4
5
6
|
UGameplayAbility_CharacterJump::UGameplayAbility_CharacterJump(const FObjectInitializer& ObjectInitializer)
	: Super(ObjectInitializer)
{
	NetExecutionPolicy = EGameplayAbilityNetExecutionPolicy::LocalPredicted;
	InstancingPolicy = EGameplayAbilityInstancingPolicy::NonInstanced;
}
|
위와 같이 많은 Policy들을 생성자에서 지정할 수 있는데, InstancingPolicy는 그중 하나이다.
InstancingPolicy
InstancingPolicy는 게임어빌리티의 인스턴스를 어떻게/몇번 생성할 것인지를 나타내는 옵션이다. 지정가능한 타입들은 아래와 같다.
 1
 2
 3
 4
 5
 6
 7
 8
 9
10
11
12
13
14
15
16
17
18
19
20
|
UENUM(BlueprintType)
namespace EGameplayAbilityInstancingPolicy
{
	/**
	 *	How the ability is instanced when executed. This limits what an ability can do in its implementation. For example, a NonInstanced
	 *	Ability cannot have state. It is probably unsafe for an InstancedPerActor ability to have latent actions, etc.
	 */
	enum Type : int
	{
		// This ability is never instanced. Anything that executes the ability is operating on the CDO.
		NonInstanced,

		// Each actor gets their own instance of this ability. State can be saved, replication is possible.
		InstancedPerActor,

		// We instance this ability each time it is executed. Replication possible but not recommended.
		InstancedPerExecution,
	};
}
|
멀티플레이 게임을 고려했을 때는 InstancedPerActor가 무난한 선택이지만, 점프의 경우 기본 클래스의 정책을 따르도록 하자.
다음으로는 공격 어빌리티를 제작할 것인데, 어빌리티에 의해 발동되는 애니메이션들은 Ability Task를 통해 재생시킬 수 있다.
Ability Task와 Gameplay Cue
게임플레이 어빌리티의 발동는 한 프레임에서만 실행된다. 시간이 지남에 따라 발생하는 작업의 경우 Ability Task나 Gameplay Cue를 이용할 수 있다.
둘의 차이점은 아래와 같다.
- Ability Task
- 어빌리티가 활성화되는 동안에만 실행된다.
- 게임에 직접적인 영향을 주는 작업을 실행할 때 사용한다.
- 주로 애니메이션, 루트모션 이동, 속성 변화에 대한 응답, 입력에 대한 응답 등에 사용된다.
- Gameplay Cue
- 게임에 직접적인 영향을 주지 않는 작업을 실행한다.
- SFX, VFX, Camera Shake 등에 사용된다.
이번에는 공격 애니메이션 몽타주를 Gameplay Task를 이용해 재생할 것이다. GAS 플러그인은 아래와 같은 여러 태스크들을 기본으로 제공한다.

애니메이션 몽타주를 재생하려면 UAbilityTask_PlayMontageAndWait를 이용하면 된다.
다음과 같은 패턴에 맞춰, 어빌리티 태스크를 이용해 애니메이션을 재생시켜볼 것이다.
- 어빌리티 태스크에 작업이 완료된 후 브로드캐스팅되는 델리게이트 선언(UAbilityTask_PlayMontageAndWait에 기본적으로 선언되어 있음)
- 어빌리티에서 위 델리게이트에 바인딩 될 콜백 함수 선언 및 바인딩
- 바인딩 후 ReadyForActivation 메서드를 이용해 태스크가 실행될 수 있는 상태 만들기
- 델리게이트에 의해 호출된 메서드에서 EndAbility를 통해 어빌리티 종료
 1
 2
 3
 4
 5
 6
 7
 8
 9
10
11
12
13
14
15
16
17
18
19
20
21
22
23
24
25
26
27
28
29
30
31
32
33
34
35
36
37
38
|
void UABGA_Attack::ActivateAbility(const FGameplayAbilitySpecHandle Handle, const FGameplayAbilityActorInfo* ActorInfo,
	const FGameplayAbilityActivationInfo ActivationInfo, const FGameplayEventData* TriggerEventData)
{
    Super::ActivateAbility(Handle, ActorInfo, ActivationInfo, TriggerEventData);

    auto Character = CastChecked<AABCharacterBase>(ActorInfo->AvatarActor.Get());
    Character->GetCharacterMovement()->SetMovementMode(EMovementMode::MOVE_None);

    // Ability Task를 이용해 애니메이션 재생시켜보기
    UAbilityTask_PlayMontageAndWait* PlayerAttackTask = UAbilityTask_PlayMontageAndWait::CreatePlayMontageAndWaitProxy(
        this,
        FName("PlayAttack"),
        Character->GetComboActionMontage()
    );
    PlayerAttackTask->OnCompleted.AddDynamic(this, &ThisClass::OnActionComplete);
    PlayerAttackTask->OnCompleted.AddDynamic(this, &ThisClass::OnActionInterrupted);
    PlayerAttackTask->ReadyForActivation();
}

void UABGA_Attack::EndAbility(const FGameplayAbilitySpecHandle Handle, const FGameplayAbilityActorInfo* ActorInfo,
    const FGameplayAbilityActivationInfo ActivationInfo, bool bReplicateEndAbility, bool bWasCancelled)
{
    Super::EndAbility(Handle, ActorInfo, ActivationInfo, bReplicateEndAbility, bWasCancelled);

    auto Character = CastChecked<AABCharacterBase>(ActorInfo->AvatarActor.Get());
    Character->GetCharacterMovement()->SetMovementMode(EMovementMode::MOVE_Walking);

}

void UABGA_Attack::OnActionComplete()
{
    EndAbility(CurrentSpecHandle, CurrentActorInfo, CurrentActivationInfo, true, false);
}

void UABGA_Attack::OnActionInterrupted()
{
    EndAbility(CurrentSpecHandle, CurrentActorInfo, CurrentActivationInfo, true, true);
}
|
디버깅
입력 처리에 성공했다면, 원하는 동작(점프, 공격)이 입력에 따라 재생되는 것을 확인할 수 있을 것이다.
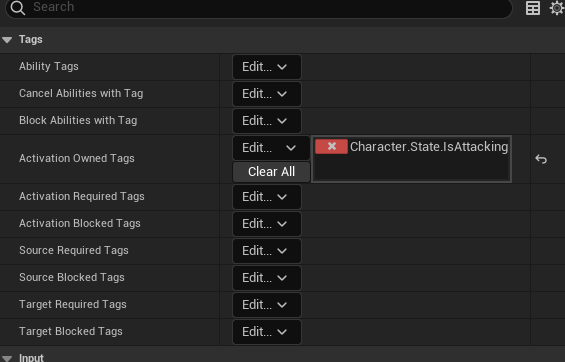
그렇지 않다면 어느 단계에서 버그가 발생하였는지 알아볼 필요가 있다. 이를 위해 어빌리티에 게임플레이 태그를 심고,
콘솔커맨드를 호출하여 PIE 뷰포트에 이를 띄워보도록 하겠다.
이전 포스트에서는 게임플레이 태그를 생성하여, 이를 cpp에서 얻어오는 코드를 작성하고 어빌리티마다 태그를 부여해주었다.
그러나 이와 같은 방식으로는, 게임플레이 태그가 변경될 때마다 cpp 빌드가 필요하기 때문에 개발 속도에 매우 큰 차질이 생긴다.
이번 포스트에서는 우리가 만든 게임어빌리티 클래스를 상속받는 blueprint 클래스를 만들고,
블루프린트에서 게임플레이 태그를 부여하여 소스코드 빌드 없이도 동일한 역할이 수행되도록 만들어보겠다. 아래는 그 과정을 나열한 것이다.
 1
 2
 3
 4
 5
 6
 7
 8
 9
10
11
|
void AABGASCharacterPlayer::PossessedBy(AController* NewController)
{
    Super::PossessedBy(NewController);
    // 중략

#if WITH_EDITOR
    auto PlayerController = CastChecked<APlayerController>(NewController);
    if(IsLocallyControlled())
        PlayerController->ConsoleCommand(TEXT("showdebug abilitysystem"));
#endif
}
|
최종화면