

Starting from Unreal Engine 5, the existing input mapping system has been deprecated. Let’s take a look at the Enhanced Input system that replaces it.
To effectively support complex input processing and runtime control remapping, the concept introduced from UE5 is Enhanced Input. It is an upgraded version of UE4’s default input system, providing backward compatibility as well. Not only does it handle input data processing, but it also allows functionalities such as radial dead zone, composite actions, combo attacks, etc., to be implemented in an asset-based environment.
Key Concepts
The Enhanced Input system has four key concepts:
- Input Action: Acts as a communication channel between the Enhanced Input system and project code. An input action can report up to three independent axis (floating point) values separate from the input that triggered itself.
- Input Mapping Context: Responsible for mapping user input to input actions. It can be dynamically added or removed for individual users and can have priorities. By applying one or more input mapping contexts to a player and assigning priorities, conflicts can be resolved even if multiple actions are triggered by the same input.
e.g., when a button opens a door and another button opens a bag
Additionally, the following two concepts are elements that make input processing more flexible.
- Modifier: Used to refine input values. It can apply a dead zone to ignore small movements or make input values smoother, among other operations. Modifiers that are already defined can be used, or developers can define their custom modifiers.
- Trigger: Determines whether to activate the input action based on processed data from modifiers or the result of other input actions.
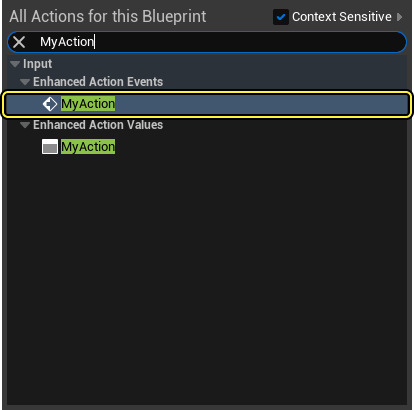
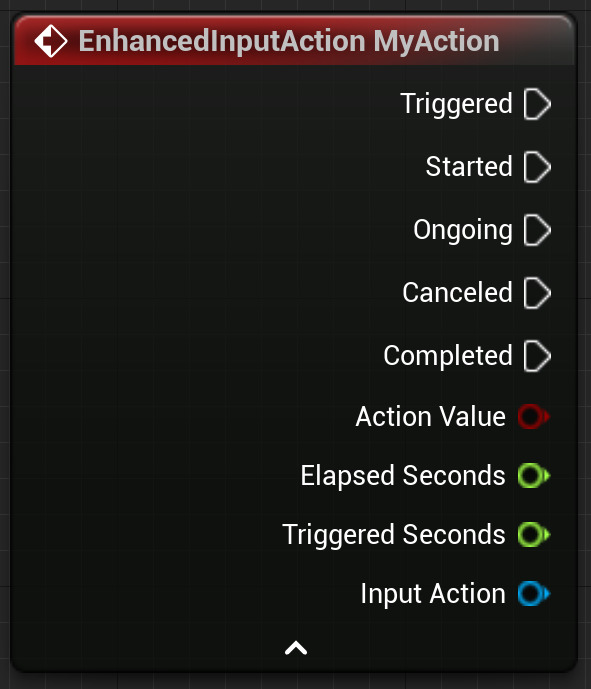
Input Actions
Connects the Enhanced Input system with project code. To trigger an input action, you must add the input action to an input mapping context and register the input mapping context in the local player’s Enhanced Input Local Player Subsystem.
To make a Pawn react to the triggered input action, you need to control it using Blueprints or C++.
|
|
Input Mapping Contexts
In an input mapping context, you can map inputs to input actions. Once a mapping is completed, the context can be added or removed anytime to the local player’s Enhanced Input Local Player Subsystem.
|
|
Modifier
A modifier is a pre-processor that can adjust input values before sending them through the trigger. The Unreal Engine provides the following modifiers by default:
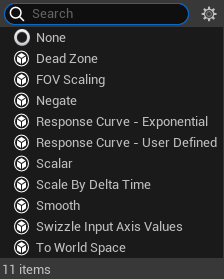
To create a new modifier, you need to create a class that inherits from the InputModifier class.
 And override the Modify Raw function.

Directional Input
One example of using modifiers effectively is implementing 2D directional input using a single input action. When creating a Third-Person Template project, examine the IA_Move and IMC_Default configurations as follows:
| Key Input | Direction | Scalar Value | Modifier | Desired Direction Vector |
|---|---|---|---|---|
| w | Up | 1 | Swizzle Input Axis Value | (1, 0, 0) |
| s | Down | 1 | Swizzle Input Axis Value, Negate | (-1, 0, 0) |
| a | Left | 1 | Negate | (0, -1, 0) |
| d | Right | 1 | - | (0, 1, 0) |
Looking at parts of the declaration and implementation of the UInputModifierSwizzleAxis class:
|
|
With the default Order being YXZ, passing through a scalar value of 1 through the modifier results in a value of (1.0f, 0.0f, 0.0f). Setting up the modifier as described in the table allows scalar values to be converted into the desired direction vectors.
Trigger
The trigger verifies processed values from modifiers and other input actions to determine whether the input action should be activated. However, the Chord Action trigger is an exception and is triggered through another input action. The images below showcase the default triggers.

There are three trigger types: Explicit, Implicit, and Blocker.
- Explicit: Input succeeds when the trigger condition is met.
- Implicit: Input succeeds if the trigger condition is met along with all implicit trigger types.
- Blocker: Input fails when the trigger condition is met.
The table below shows the type of triggers based on their classes:
| Trigger Class (cpp) | Type |
|---|---|
| UInputTrigger(default) | Explicit |
| UInputTriggerCombo | Implicit |
| UInputTriggerChordAction | Implicit |
| UInputTriggerChordBlocker | Blocker |
After processing user input, the trigger can return one of three states:
- None: The conditions were not met, and the trigger failed.
- Ongoing: The conditions were partially met and the trigger is still in progress but has not yet succeeded.
- Triggered: All input trigger conditions were met, and the input trigger succeeded.
By inheriting the InputTrigger class or the InputTriggerTimedBase class, you can create custom triggers. The InputTriggerTimedBase class checks if input has been sustained for a certain period and returns the Ongoing state during that time. However, as the InputTriggerTimedBase class does not return Triggered even if the conditions are met, when creating a new trigger by inheriting it, you must override the GetTriggerType and UpdateState methods to return the desired states.